We have come to the final part of this tutorial series. The actual game thread. This is where the “fun” happens. Unfortunately, I should say this already, I’ve purposefully made this a rather dull game. A small ball that you can move around the screen, scoring points by hitting the side walls, and ending the game by moving out of the top or bottom of the screen. The reason for this is that *YOU* should innovate here. You can go and see what I’ve done up until now here, I hope you’ll test them out, and (if you like them) give feedback on the games on the market, but what I’d really enjoy seeing is somebody creating other games based on this. Please if you do, go ahead, and make a comment on this blog post about it, who knows, others might see it and download your game as well 😉
Hiho – enough words from “the sponsor”, i.e. me. Lets get on with it.
First of all create the GameThread class, it should extend the thread class.
public class GameThread extends Thread
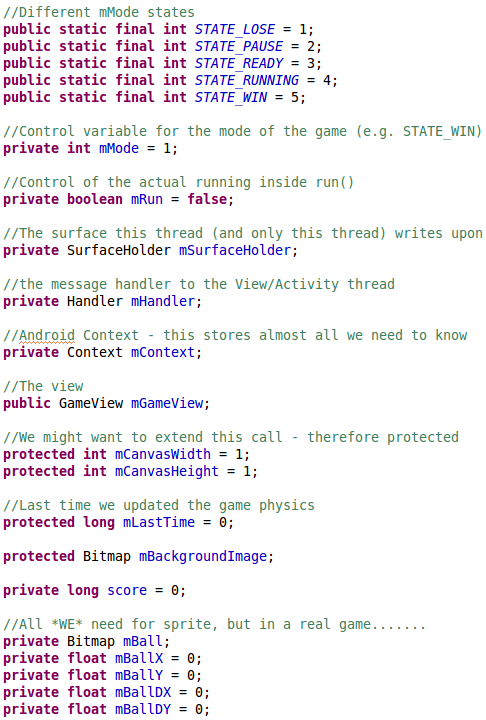
Next add these attributes:
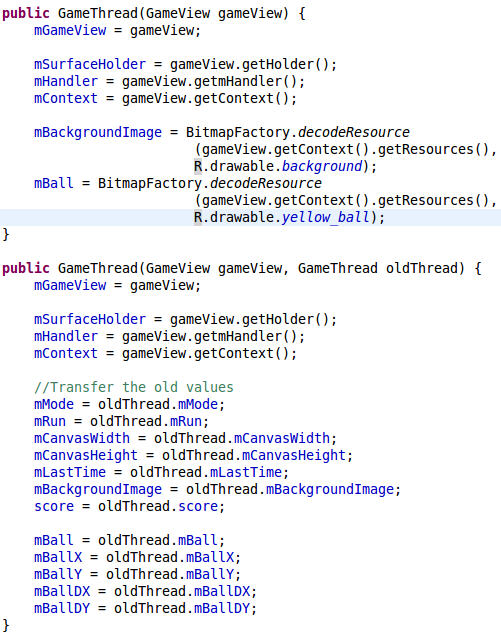
Most of these are explained through the comments, or will become obvious late in this part. The mMode is the states that we have frequently used in the previous parts of the tutorial. Next we construct the GameThread, we need two, because GameView.surfaceChanged() needs two different ones:
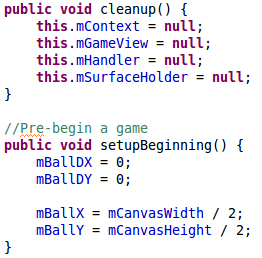
Notice how we use the BitmapFactory class to decode resources from R.drawable, and that we just use the old mBall attribute to get the bitmap in the new GameThread when we have an old thread available. Otherwise nothing new to see here, and cleanup() is also quite mundane now:
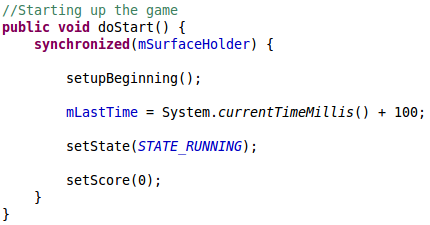
so lets introduce the first gaming method. We just setup a ball with no initial movements in the middle of the canvas. This method is called by the doStart() method,
which prepares the game state and set the mode to running.
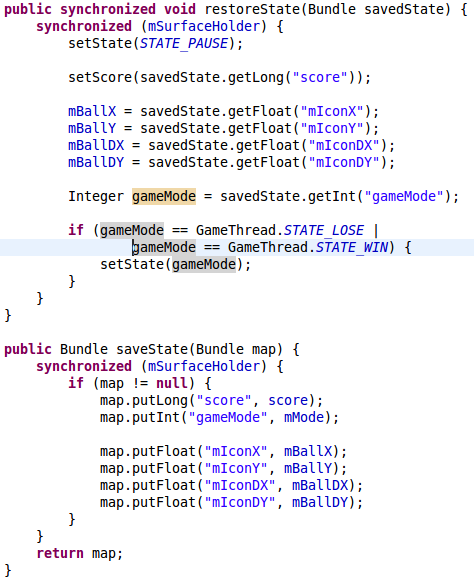
Earlier in GameActivity we set up a system to save and restore states. This system needs these two methods:
Notice how the Bundle class is used to save and restore the values of the class attributes.
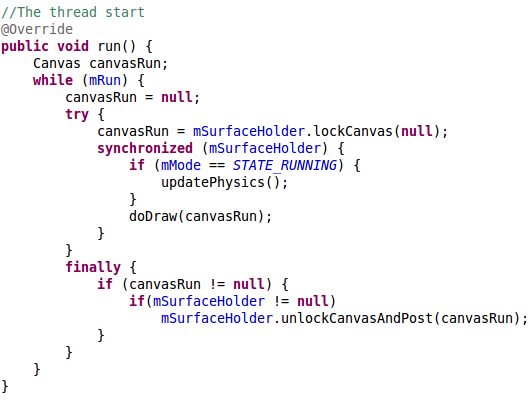
The most important part of a game is the game loop:
This loop runs until mRun is false, which can happen in setRunning(). We synchronize on the mSurfaceHolder to avoid multiple draws (don’t mind if you don’t get this), and then update the physics and draw on the canvas, and that is basically all that is needed to run a game.
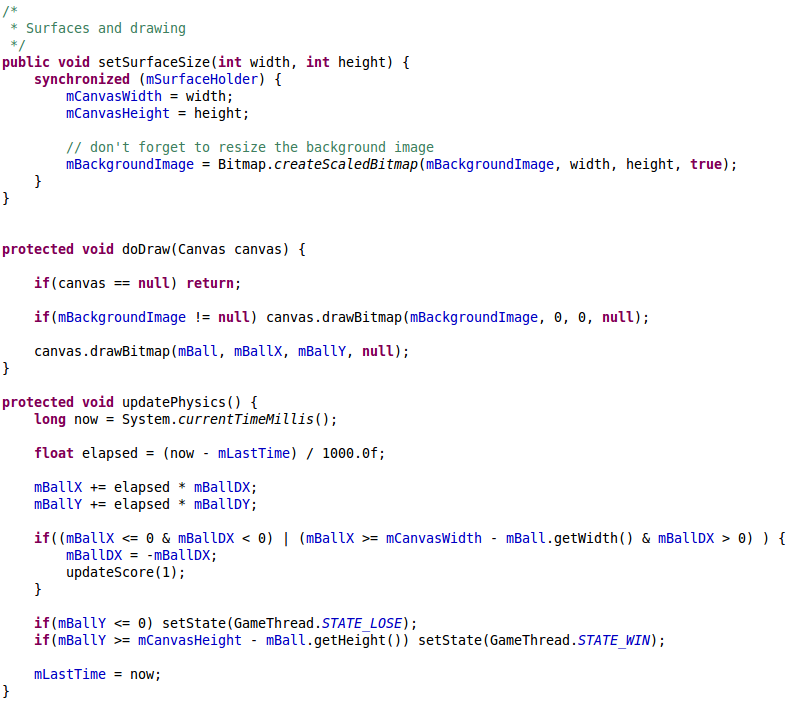
The setSurfaceSize() is called before the game is started and sets up an appropriately sized background. doDraw() simply takes the background bitmap and and ball bitmap and draw them on the canvas. The updatePhysics moves the ball using the DX and DY values. Notice that the elapse time between updates are used to ensure a correct size of the move. The “game logic” has also been put here, with an update of the score (updateScore() will be created later) , and checks to see if the game is won or lost.
The user interface control methods are
The onTouch() is there to allow starting the game, and it is prepared for in game interaction as well. The onSensorChanged() method is called every time the sensor changes, and just changes the ball’s DX and DY values.
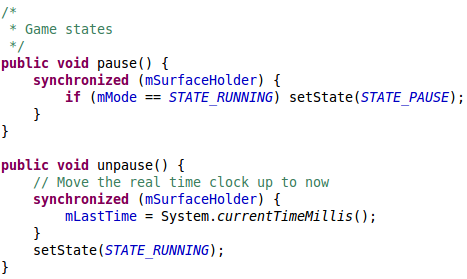
To manage the different states the game can be in, the following methods are created
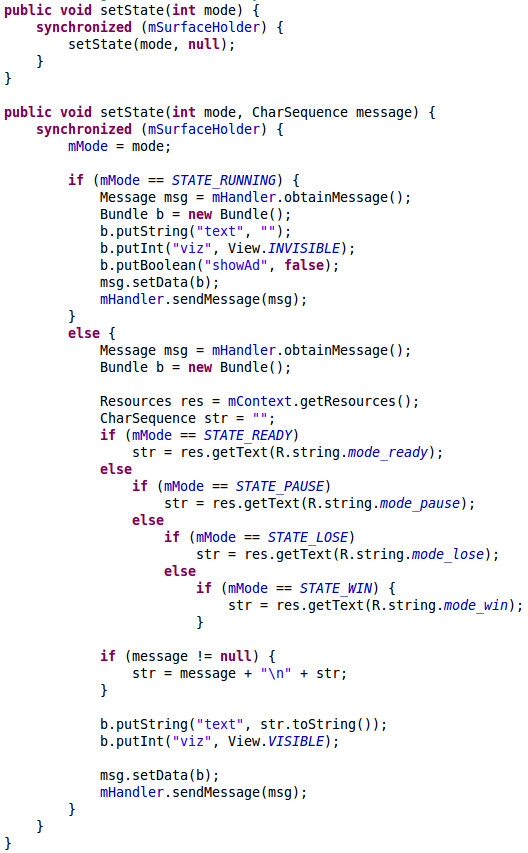
and the setState methods manages changes in states and sends messages to GameView to display messages to the user
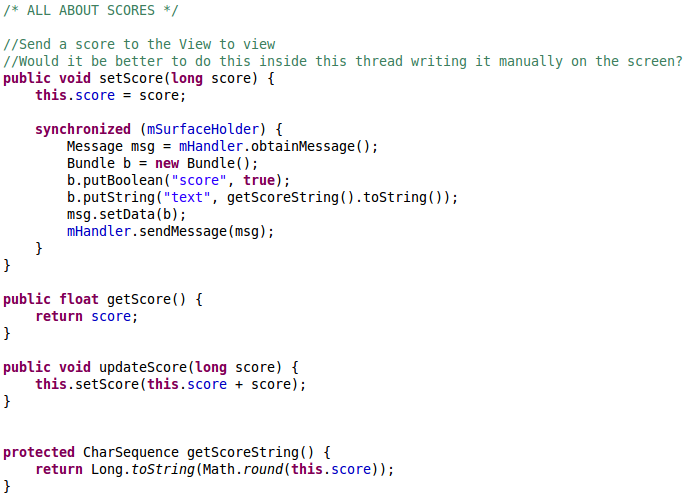
Handler.sendMessage is used to send the message to GameView. This method is also used to send scores to GameView:
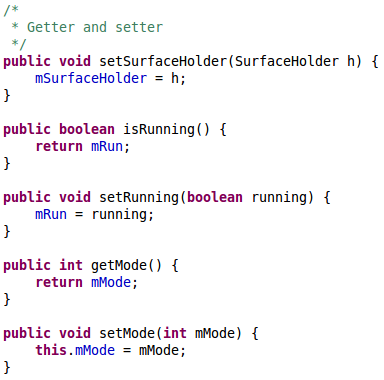
and last we create a few getters and setters
and that is it, the game is finished! I almost forgot, you can get the GameThread.java file for your convenience. Now you can test if it works in the emulator, unfortunately within the emulator the accelerometer won’t work (unless you set it up using this method), so if you want to test using touchscreen just change the actionOnTouch() method and use the MotionEvent object to get hold of x and y coordinates. Obviously if you have an Android phone you can just use that for debugging…
Please let me know if you find any mistakes in this tutorial. Otherwise,
THE END
 = mCanvasWidth – mBall.getWidth() & mBallDX > 0) ) { mBallDX = -mBallDX; updateScore(1); } if(mBallY <= 0) setState(GameThread.STATE_LOSE); if(mBallY >= mCanvasHeight – mBall.getHeight()) setState(GameThread.STATE_WIN); mLastTime = now; }” width=”790″ height=”705″ />
![Control functions /* * Control functions */ //Finger touches the screen public boolean onTouch(MotionEvent e) { if(e.getAction() != MotionEvent.ACTION_DOWN) return false; if(mMode == STATE_READY || mMode == STATE_LOSE || mMode == STATE_WIN) { doStart(); return true; } if(mMode == STATE_PAUSE) { unpause(); return true; } synchronized (mSurfaceHolder) { this.actionOnTouch(e); } return false; } private void actionOnTouch(MotionEvent e) { //TODO do something } //The Accellerometer has changed public void onSensorChanged(SensorEvent event) { synchronized (mSurfaceHolder) { if (event.sensor.getType() == Sensor.TYPE_ORIENTATION) { mBallDX -= 1.5f*event.values[2]; mBallDY -= 1.5f*event.values[1]; } } }](http://oster-lundqvist.com/karsten/wp-content/uploads/2011/06/control-functions.png)

Dear sir,
These can not be resolved, it says ‘can not be resolved or it is not a field’
mGameView = (GameProjectView)findViewById(R.id.gamearea);
mGameView.setStatusView((TextView)findViewById(R.id.text));
mGameView.setScoreView((TextView)findViewById(R.id.score));
and also these,
menu.add(0, MENU_START, 0, R.string.menu_start);
menu.add(0, MENU_STOP, 0, R.string.menu_stop);
menu.add(0, MENU_RESUME, 0, R.string.menu_resume);
even though I had clearly placed them in the strings.xml
I will try my best to follow your tutorials, even though english is not my first language but I found your method of teaching is one of the best, through and precise to the point
If you wouldn’t mind please help with the above problems,
Iam at lost with these too,
mGameView = (GameProjectView)findViewById(R.id.gamearea);
mGameView.setStatusView((TextView)findViewById(R.id.text));
mGameView.setScoreView((TextView)findViewById(R.id.score));
where is (R.id….) located in the whole scheme of things
Thanks for your help
regards
Vik
Hi Vik
Thanks for you kind words 😉
Regarding your problem. I’ve seen this problem before when I ran it with my students at the University at work at, and it most likely relates to a bug in the Eclipse Android plugin.
R is normally updated automatically when resources are added to the /res folder (it is a system wide help object storing all available resources), so if you have added the graphics in res/drawable and strings in res/values/strings.xml R *should* update automatically. But rarely it doesn’t, most often when people copy and paste files into the folder. When I ran this tutorial with my students out of 42 students under 5 students experienced this, even though seemingly they did exactly the same as all the other students.
I managed to solve this problem by undoing changes until R was in sync with the actual folder, and then manually add the necessary strings and resources.
I hope this helps you…
Best regards,
Karsten
thanks for the explanation,
after some clean-up the R.java behave itself and fixed the problem. but the error indicator still showing in the project name and no errors shown in all the pages,. GameView.java , GameThread.java , gameActivity.java and all other pagaes are all clean.
I will keep trying… thanks again
Have you tried clean the project (under the project menu), that usually helps when Eclipse “acts” up like that. The last resort is to try and create a new project using the source code you already have…
Thank you, I just did that…Everything is cleared now and no errors and warning signs(am very happy) but when open in emulator the yellow ball appeared on left top corner, the word ‘score’ appeared on top center and the ‘play’ appeared in the middle of the emulator screen.
when click on the ball or anywhere on the screen, the ball moves(jumps) to the middle of the screen and the word ‘score’ and the word ‘play’ disappeared…and thats it. Its stops to response to both keyboard and soft keyboard nor mouse click.
Thanks again
That sounds strange. Perhaps you change the state to STATE_WIN somehow immediately after starting the game? None of my “real world” students experienced that behaviour, but it sounds like there is something wrong with the state of the game…
Thank you for following this.
my comments are half question and the other half is just updating my progress…I know that there is something somewhere I miss read or miss whatever, typical beginner…..but I am happy to try anything
Thank you again
Hi! Great tutorial! I want to measure the speed when the ball hits the wall. Do yoi know how to do that? I want the game to be over when the speed at the collision is is bigger than a certain value. I am at loss now after several hours of playing with your code
Happy you like the tutorial – always nice to hear 🙂
To get the speed of the ball at any given time, you need to look at the mBallDX and mBallDY variables. They basically make up amovement of the Ball in the X and Y direction (pixels pr second as I recall it).Create a vector of those two numbers, and find the length of it and you should be set…
(Or use Pythagoras: find the value of the c in c^2=b^2+a^2)
Hope this helps…
Cannot I use mBallDX simply? I tested it and when the mBallDX is around 300, the speed is lighter, when it is around 500, higher and when more 600-700, the speed is very high. Of course, in this case the ball collides with the right wall.
You can, but you’ll only measure the speed on the X-axis.
If the ball travels fast, but mostly downwards, so on the Y-axis, and hits the wall, then it might not measure as a fast ball in your code…
Can you give me a description about the how to movement is done in your code? I see that in the GameView.java the onSensorChange() function pushes the accelerometer data (x,y,z) to GameThread.java.
There you are using the if (event.sensor.getType() == Sensor.TYPE_ORIENTATION) condition, which is not needed, the code works the same way without it. Btw, why are you checking the orientation sensor if you are passing accelerometer values from the GameThread class? This confuses me. I read some blogs about collision detection and a bit about the pythagoras, but I don’t what I should do. Right now colliding with the right wall is detected right, but I may have serious problems later if using only the mBallx and mBally variable is not the appropriate way to measure speed.
Please write me a mail to balintfarago@gmail.com, you are expecting here short questions and opinions about your code, and I don’t want to make your site a mess with my questions.
UpdatePhysics() is where the actual movement is controlled. Remember the mBallX is the acutal X position and mBallDX is the velocity on the X-axis.
The if statement is strictly speaking not necessary in the practical, but it is future proofing the code. For instance if you want to capture screen presses or other sensor inputs, then you’ll need to investigate the event’s sensor type, and I’ve left that there from the real games.
Because mBallDY and mBallDX are measuring pixels/sec on axis (therefore 90 degrees difference in direction) then we can use Pythagoras to find the actual speed:
c^2 = a^2 + b^2 =>
c = (a^2 + b^2)^1/2
Therefore the speed of a ball is (in Java):
speed = Math.sqrt(mBallDY*mBallDY+mBallDX*mBallDX);
Oh and I like your comments here. Others might have the same problems, and can then learn from our dialog.
I hope it helps you…
Thank you very much for the great tutorial. I have over 10 years experience in Microsoft technologies, and just recently started learning android programing. I got a few questions and hope you can answer.
1. In WinForms or WPF, if you access UI thread from a background thread, you have to do Invoke, or you get an exception. It looks Java doesn’t have this problem. Is it true?
2. I’m confused by the term “state” and “mode” in your tutorial. I believe the confusion comes from the fact that there are two different states: thread state and game state. The constants are defined as “STATE_LOSE” or “STATE_WIN” and so on, but you use getMode and setMode to refer to them. getState is coming from Thread. But what the difference between setMode and setState? Actually this leads me to the next question.
3. In .NET, we are strongly discouraged to use constants like “STATE_LOSE”, instead we would use enum to make it more type safe. This way I would immediately see the difference between setState and setMode. I’m wondering why enum is not used? It is supported in Java, right? In fact, when I looked at some of the tutorials in Object-C, they don’t use enum either, why?
Hi, thanks for the question. There are some really good points!
Regarding 1:
In principle a background thread can’t write on the canvas. You’ll notice that less speed intensive drawing, which is performed through the “normal” Android View classes, are sent from the gamethread to the view via the mHandler messaging object. However it is possible to manually circumvent this general rule by using synchronization. This is used in java to managed thread access to parts of thread critical code. So in the run method of the gamethread I first lock the canvas to say that the gamethread is now drawing on the canvas (i.e. any other thread drawing will cause an exception, and then I synchronize on the surface object. Any other blocks of code, which is synchronized on the object will not be able to perform their code, until the gamethread leaves the synchronized block of code. This allows us to draw directly from the background game thread.
Regarding 2:
I agree this is a little confusing, and I suppose I ought to clear up the naming convention. getMode relates to my user defined states within my game. I’ve “adopted” the naming from on of Google very simple games (Lunar Lander), and I ought to have used a better name. My only redeeming factor is that I’m in good company making that mistake 😉
The getState from the thread has nothing to do with my game’s state, which is purely there to maintain the game logics. The thread state of a thread is saying something about whether the thread is running or paused. You can see them here.
Regarding 3:
I have developed in .NET myself, and I know that enums are used a lot. And sure they are also available on Android/Java. But they came rather late in the history of Java –I believe in v1.5, and therefore “old skoolers” like myself haven’t gotten used to them properly. You will also see this practice in a lot of the Google supplied practicals, which again only shows that my own bad practice isn’t unique but shared amongst other! Again I probably should update this once I get the time, on the other hand, nothing as nice as looking at old skool coding 😉
You will also notice that I am not following strict OOP guidelines in the code. This is to optimise the code for pre-v2.2 Android devices, as the JIT wasn’t introduced there and therefore some naughty public attributes are used etc. If you are interested in these issues, then you can go to this Google page
Hope this helps!
i cant run the code..it is force-closed…plz give some suggestions…
to help you I need a stack trace of the force close (go to the log of the emulator/device), otherwise there are way too many possibilities.
If you follow the tutorial 100% then it works, I’ve seen many students do it, so it is probably a small mistake somewhere…
I’m having the same problem as the above post, there are no errors in the log but i’m always made to force close the game. I think it may have something to do with the accelerometer not working on emulator. Could you please explain how i can modify the code to use the touch screen without the accelerometer
The code works in an emulator, I’ve seen that many times. The ball just won’t move.
However, to move the ball on touch, use the actionOnTouch method to change the ball’s movement accordingly.
I’m new in android and java, I was if you have a list of a class enemy when saving the state will you yous the same method to save the state, my questions is because you use a pair to save values and so calling a method saveState from the class enemy that has variables x, y (position) that will do like putint(“x”, x)
and putint(“y”, y) in every call to the diferent enemies on the list will probably override or x,y pair of the bundle records, will you use something like putint(“x”+index, x) or there is better way, I tried with files but I came from C++ world and I having trouble writing using FileOutputStream file since it does not write floats or integers just bytes and bytearray and it dosn’t seem like you can say write(floaval, sizeof(float)) or is it?
Hi there. You can certainly use a naming scheme for the keys like the one you describe.
More generally with objects objects in Java you can save them directly to files if they implement the Serializable interface. You can read about it here. This method can also be used with bundles as there conveniently is a putSerializable() method.
When the game loads the ball is placed to a specific place in the view because of private float mBallX =300; private float mBallY = 150;, but when the game starts the ball starts to move from elsewhere because in setupBeginning() I write mBallX = mCanvasWidth / 2; mBallY = mCanvasHeight / 2;
How can I place the ball here when the game loads? I mean when you see the game but cannot move the ball.
Interesting “little” problem.
You need to set the mBallX and mBallY at the first possible moment – the moment when the screen size is first known.
setSurfaceSize is probably the easiest place to do that. It ought to be called only once, so I think it should be ok.t